 During my stint as a fluffer at the Cripple Croaked Assisted Living Facility, I was constantly reminded about sag. But as a Dual Sport rider suspension sag is something I only thought about once – when I originally purchased my bike. For most novice riders its easy to assume that once sag is set it will not change. This is both true and false, a contradiction that’s best understood when you understand just what the hell suspension sag is in the first place.
There’s two types of suspension sag: static (or Laden) sag and race sag. Static sag is the amount the rear suspension compresses under the weight of the bike itself. Race sag is the amount the rear suspension compresses under the weight of the bike with your fat ass riding it, including all your gear and the crap you carry in an overstuffed fanny pack.
So while the static sag might remain unchanged over the years (assuming you didn’t impulsively strap a pony keg to your bike) the race sag is something that can be variable (unless you maintain a strict diet of cigarettes and methamphetamine). Coincidentally, I happen to have two perfect examples of how these settings can change.
During my stint as a fluffer at the Cripple Croaked Assisted Living Facility, I was constantly reminded about sag. But as a Dual Sport rider suspension sag is something I only thought about once – when I originally purchased my bike. For most novice riders its easy to assume that once sag is set it will not change. This is both true and false, a contradiction that’s best understood when you understand just what the hell suspension sag is in the first place.
There’s two types of suspension sag: static (or Laden) sag and race sag. Static sag is the amount the rear suspension compresses under the weight of the bike itself. Race sag is the amount the rear suspension compresses under the weight of the bike with your fat ass riding it, including all your gear and the crap you carry in an overstuffed fanny pack.
So while the static sag might remain unchanged over the years (assuming you didn’t impulsively strap a pony keg to your bike) the race sag is something that can be variable (unless you maintain a strict diet of cigarettes and methamphetamine). Coincidentally, I happen to have two perfect examples of how these settings can change.

DOES MY SUSPENSION LOOK A BIT SOFT?
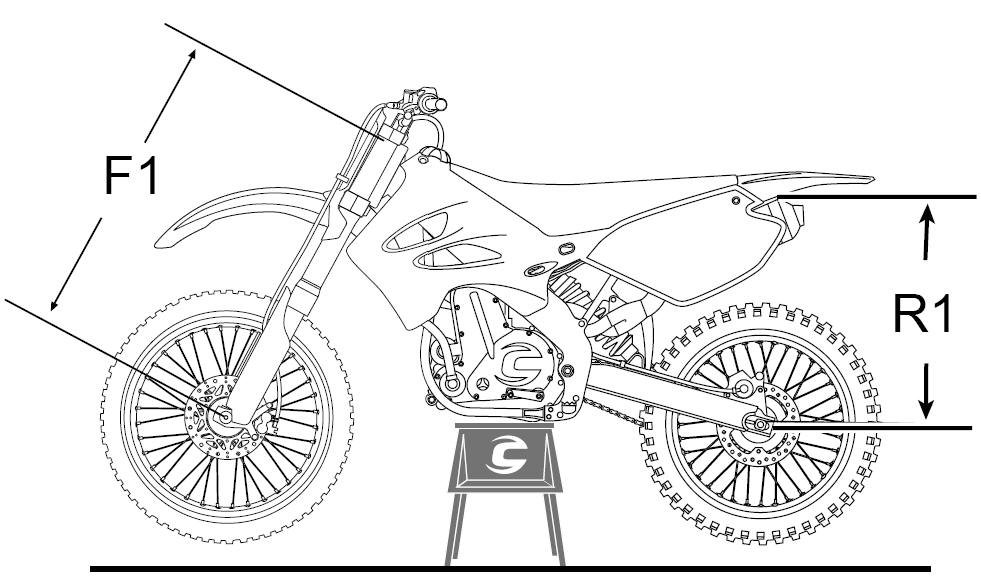 Step 1 Park your bike on a service stand, milk crate, or tree stump so that the rear wheel is hanging freely off the ground. Pick a convenient measuring point above the rear axle such as a seat bolt or blood stain, then measure from this point to the rear axle. Tattoo the measurement above your left nipple, you’ll need it later. This is referred to as the full extension measurement.
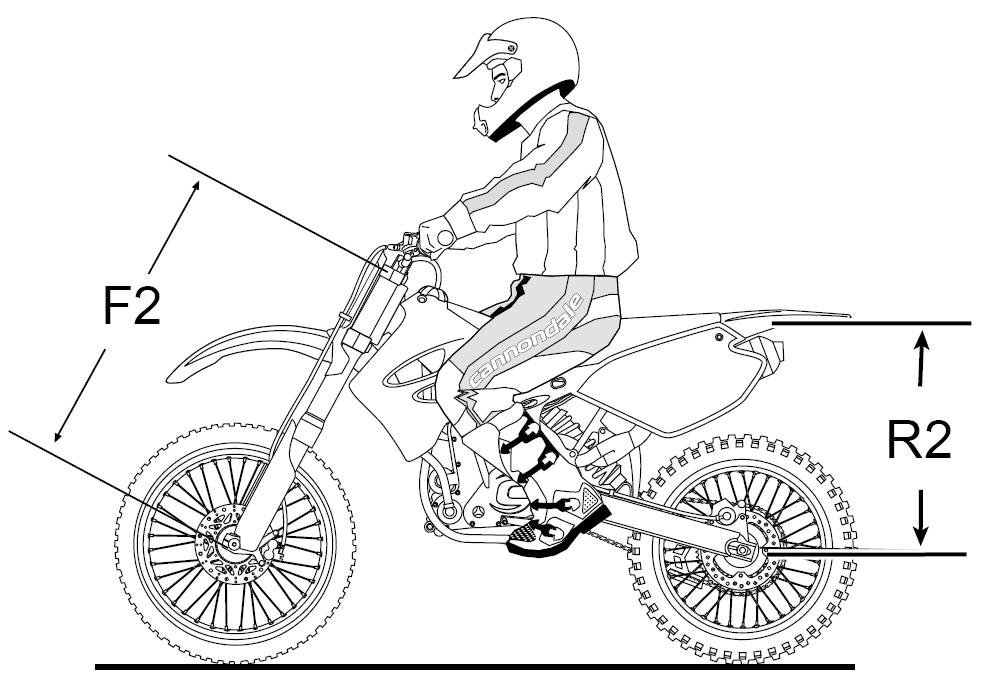 Step 2 Pull the bike off the service stand and park it on a level surface. Put ALL your riding gear on, including any type of pack you wear. Get a friend, family member, or homeless man to help hold the bike steady while you climb on and stand on the pegs. If you are homeless yourself, a helping hand can be substituted by leaning the bike against the wall of a methadone clinic. Then find your convenient measuring point again and re-measure to the rear axle. Write this measurement on the back of the piece of cardboard you hold up at intersections while pan handling. This is your race sag and ideally, should be set around 30 to 35% of the total rear wheel travel, which can be found in your owner’s manual or online – typically around 4 inches. That’s 95 to 115mm if you’re a Bolshevik.
Adjustments are made using a hammer and punch. Simply knock the top locking nut loose, then adjust the preload nut accordingly: tighten to decrease race sag, raise the rear end and improve handling; loosen to increase race sag, lower the rear end and improve high speed stability.
Step 2 Pull the bike off the service stand and park it on a level surface. Put ALL your riding gear on, including any type of pack you wear. Get a friend, family member, or homeless man to help hold the bike steady while you climb on and stand on the pegs. If you are homeless yourself, a helping hand can be substituted by leaning the bike against the wall of a methadone clinic. Then find your convenient measuring point again and re-measure to the rear axle. Write this measurement on the back of the piece of cardboard you hold up at intersections while pan handling. This is your race sag and ideally, should be set around 30 to 35% of the total rear wheel travel, which can be found in your owner’s manual or online – typically around 4 inches. That’s 95 to 115mm if you’re a Bolshevik.
Adjustments are made using a hammer and punch. Simply knock the top locking nut loose, then adjust the preload nut accordingly: tighten to decrease race sag, raise the rear end and improve handling; loosen to increase race sag, lower the rear end and improve high speed stability.
 Step 3 With the bike still parked on a level surface, hop off and lift up the rear end a few inches and then let it settle back down (do not push it back down). Repeat this a few times to make sure the bike has found its natural resting place. Then find your convenient measuring point yet again and measure to the rear axle. Tattoo this measurement above your right nipple. Subtract the number above your right nipple from the number above your left nipple (the full extension measurement). This is your static sag. Ideally this measurement should be between 3/4 to 1 1/2 inches. If you subtract nipple numbers and get less than 1/2 inch your rear spring is way too soft or you need to go on a strict diet of cigarettes and methamphetamine. If it’s above 1 3/4 inch your spring is too stiff or you’re about to drop dead from a strict diet of cigarettes and methamphetamine. To achieve accuracy with the static sag measurement, its imperative that the RACE SAG IS SET FIRST.
Additional Comments: Measurements can easily be taken with a tape measure, but I found using a drywall square offers more consistency. Drywall squares are available at Home Depot, in the back of contractor’s trucks at construction sites, or are occasionally lying in ditches along state roads and highways.
Measurements should be taken when the shock is cold.
In a perfect world, purpose-built spanner wrenches are great for adjusting the locking rings. But unless you’re willing to take the time to tear your bike halfway apart, there won’t be room to accommodate them. I recommend using a brass punch or drift to adjust the locking rings. Steel punches can damage the rings or accidentally mar the threads, particularly when used in conjunction with a large hammer after ingesting copious amounts of beer.
So even though there might not be an adjustment for the sag that’s associated with old age that doesn’t involve scalpels, silicone, and a second mortgage, keeping your Dual Sport’s rear suspension sag in check is quick and easy!
Step 3 With the bike still parked on a level surface, hop off and lift up the rear end a few inches and then let it settle back down (do not push it back down). Repeat this a few times to make sure the bike has found its natural resting place. Then find your convenient measuring point yet again and measure to the rear axle. Tattoo this measurement above your right nipple. Subtract the number above your right nipple from the number above your left nipple (the full extension measurement). This is your static sag. Ideally this measurement should be between 3/4 to 1 1/2 inches. If you subtract nipple numbers and get less than 1/2 inch your rear spring is way too soft or you need to go on a strict diet of cigarettes and methamphetamine. If it’s above 1 3/4 inch your spring is too stiff or you’re about to drop dead from a strict diet of cigarettes and methamphetamine. To achieve accuracy with the static sag measurement, its imperative that the RACE SAG IS SET FIRST.
Additional Comments: Measurements can easily be taken with a tape measure, but I found using a drywall square offers more consistency. Drywall squares are available at Home Depot, in the back of contractor’s trucks at construction sites, or are occasionally lying in ditches along state roads and highways.
Measurements should be taken when the shock is cold.
In a perfect world, purpose-built spanner wrenches are great for adjusting the locking rings. But unless you’re willing to take the time to tear your bike halfway apart, there won’t be room to accommodate them. I recommend using a brass punch or drift to adjust the locking rings. Steel punches can damage the rings or accidentally mar the threads, particularly when used in conjunction with a large hammer after ingesting copious amounts of beer.
So even though there might not be an adjustment for the sag that’s associated with old age that doesn’t involve scalpels, silicone, and a second mortgage, keeping your Dual Sport’s rear suspension sag in check is quick and easy!